New maintainer wanted! I will no longer use Deye devices. Partly because of the #RelaisGate.
Get information from Deye Microinverter
The whole thing is just a learning exercise for now. We will see.
- clone the sources
- Bootstrap and create default user settings by just call
./cli.py edit-settings - Change the settings for your needs
- ...use the commands... ;)
- Setup systemd service to publish the inventer values to a Home Assistant instance via MQTT
Currently just clone the project and just start the cli (that will create a virtualenv and installs every dependencies)
Note: Please enable https://www.piwheels.org/ if you are on a Raspberry Pi !
e.g.:
~$ git clone /~https://github.com/jedie/inverter-connect.git
~$ cd inverter-connect
~/inverter-connect$ ./cli.py --help
The output of ./cli.py --help looks like:
Usage: ./cli.py [OPTIONS] COMMAND [ARGS]...

╭─ Options ────────────────────────────────────────────────────────────────────────────────────────╮
│ --help      Show this message and exit.                                                          │
╰──────────────────────────────────────────────────────────────────────────────────────────────────╯
╭─ Commands ───────────────────────────────────────────────────────────────────────────────────────╮
│ debug-settings        Display (anonymized) MQTT server username and password                     │
│ edit-settings         Edit the settings file. On first call: Create the default one.             │
│ inverter-version      Print all version information of the inverter                              │
│ print-at-commands     Print one or more AT command values from Inverter.                         │
│ print-values          Print all known register values from Inverter, e.g.:                       │
│ publish-loop          Publish current data via MQTT for Home Assistant (endless loop)            │
│ read-register         Read register(s) from the inverter                                         │
│ set-time              Set current date time in the inverter device.                              │
│ systemd-debug         Print Systemd service template + context + rendered file content.          │
│ systemd-remove        Write Systemd service file, enable it and (re-)start the service. (May     │
│                       need sudo)                                                                 │
│ systemd-setup         Write Systemd service file, enable it and (re-)start the service. (May     │
│                       need sudo)                                                                 │
│ systemd-status        Display status of systemd service. (May need sudo)                         │
│ systemd-stop          Stops the systemd service. (May need sudo)                                 │
│ test-mqtt-connection  Test connection to MQTT Server                                             │
│ version               Print version and exit                                                     │
╰──────────────────────────────────────────────────────────────────────────────────────────────────╯
Update your settings via: ./cli.py edit-settings and insert MQTT credentials in section [mqtt]
Check also the config section [systemd] and [systemd.template_context]
but normally they must not be changed ;)
To verify your settings, call: ./cli.py debug-settings
To see the systemd service file content, just call: ./cli.py systemd-debug
Note: Some of the systemd commands, needs sudo because a normal user can't change systemd services!
You will see permission errors with a hint to call the cli with sudo ;)
If everything looks okay, setup and start the systemd service with: sudo ./cli.py systemd-setup
Check the services with: sudo ./cli.py systemd-status
Help from ./cli.py print-values --help Looks like:
Usage: ./cli.py publish-loop [OPTIONS]

 Publish current data via MQTT for Home Assistant (endless loop)
 The "Daily Production" count will be cleared in the night, by set the current date time via
 AT-command.

╭─ Options ────────────────────────────────────────────────────────────────────────────────────────╮
│ *  --ip             TEXT                                  IP address of your inverter [required] │
│ *  --port           INTEGER                               Port of inverter services              │
│                                                           [default: 48899]                       │
│                                                           [required]                             │
│ *  --inverter       [deye_2mppt|deye_4mppt|deye_sg04lp3]  Prefix of yaml config files in         │
│                                                           inverter/definitions/                  │
│                                                           [default: deye_2mppt]                  │
│                                                           [required]                             │
│    --verbosity  -v  INTEGER RANGE [0<=x<=3]               Verbosity level; Accepts integer value │
│                                                           e.g.: "--verbose 2" or can be count    │
│                                                           e.g.: "-vv"                            │
│                                                           [default: 0; 0<=x<=3]                  │
│    --help                                                 Show this message and exit.            │
╰──────────────────────────────────────────────────────────────────────────────────────────────────╯
Help from ./cli.py print-values --help Looks like:
Usage: ./cli.py print-values [OPTIONS]

 Print all known register values from Inverter, e.g.:
 .../inverter-connect$ ./cli.py print-values

╭─ Options ────────────────────────────────────────────────────────────────────────────────────────╮
│ *  --ip             TEXT                                  IP address of your inverter [required] │
│ *  --port           INTEGER                               Port of inverter services              │
│                                                           [default: 48899]                       │
│                                                           [required]                             │
│ *  --inverter       [deye_2mppt|deye_4mppt|deye_sg04lp3]  Prefix of yaml config files in         │
│                                                           inverter/definitions/                  │
│                                                           [default: deye_2mppt]                  │
│                                                           [required]                             │
│    --verbosity  -v  INTEGER RANGE [0<=x<=3]               Verbosity level; Accepts integer value │
│                                                           e.g.: "--verbose 2" or can be count    │
│                                                           e.g.: "-vv"                            │
│                                                           [default: 0; 0<=x<=3]                  │
│    --compact    -c                                        Only show the values concerning power  │
│                                                           generation                             │
│    --help                                                 Show this message and exit.            │
╰──────────────────────────────────────────────────────────────────────────────────────────────────╯
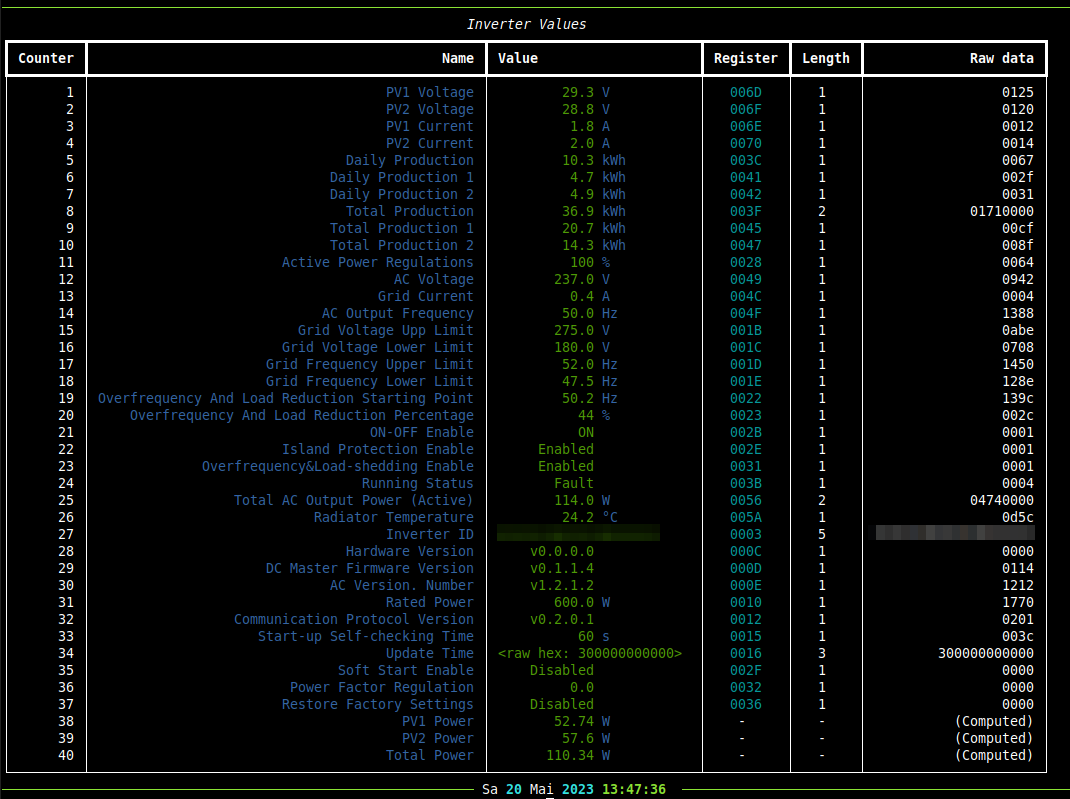
Example output of print-values call:
Help from ./cli.py print-at-commands --help Looks like:
Usage: ./cli.py print-at-commands [OPTIONS] [COMMANDS]...

 Print one or more AT command values from Inverter.
 Use all known AT commands, if no one is given, e.g.:
 .../inverter-connect$ ./cli.py print-at-commands
 Or specify one or more AT-commands, e.g.:
 .../inverter-connect$ ./cli.py print-at-commands WEBVER .../inverter-connect$ ./cli.py
 print-at-commands WEBVER WEBU
 e.g.: Set NTP server, enable NTP and check the values:
 .../inverter-connect$ ./cli.py print-at-commands NTPSER=192.168.1.1 NTPEN=on NTPSER NTPEN
 wait a while and request the current date time:
 .../inverter-connect$ ./cli.py print-at-commands NTPTM
 (Note: The prefix "AT+" will be added to every command)

╭─ Options ────────────────────────────────────────────────────────────────────────────────────────╮
│ *  --ip             TEXT                     IP address of your inverter [required]              │
│ *  --port           INTEGER                  Port of inverter services [default: 48899]          │
│                                              [required]                                          │
│    --verbosity  -v  INTEGER RANGE [0<=x<=3]  Verbosity level; Accepts integer value e.g.:        │
│                                              "--verbose 2" or can be count e.g.: "-vv"           │
│                                              [default: 0; 0<=x<=3]                               │
│    --help                                    Show this message and exit.                         │
╰──────────────────────────────────────────────────────────────────────────────────────────────────╯
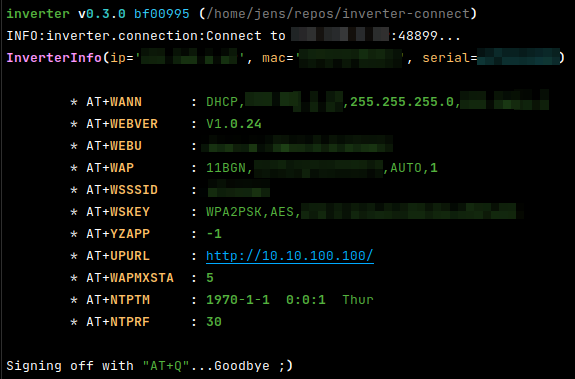
Example output of print-at-commands call:
Help from ./cli.py read-register --help Looks like:
Usage: ./cli.py read-register [OPTIONS] REGISTER LENGTH

 Read register(s) from the inverter
 e.g.: read 3 registers starting from 0x16:
 .../inverter-connect$ ./cli.py read-register 0x16 3
 e.g.: read the first 32 registers:
 .../inverter-connect$ ./cli.py read-register 0 32
 The start address can be pass as decimal number or as hex string, e.g.: 0x123

╭─ Options ────────────────────────────────────────────────────────────────────────────────────────╮
│ *  --ip             TEXT                     IP address of your inverter [required]              │
│ *  --port           INTEGER                  Port of inverter services [default: 48899]          │
│                                              [required]                                          │
│    --verbosity  -v  INTEGER RANGE [0<=x<=3]  Verbosity level; Accepts integer value e.g.:        │
│                                              "--verbose 2" or can be count e.g.: "-vv"           │
│                                              [default: 0; 0<=x<=3]                               │
│    --help                                    Show this message and exit.                         │
╰──────────────────────────────────────────────────────────────────────────────────────────────────╯
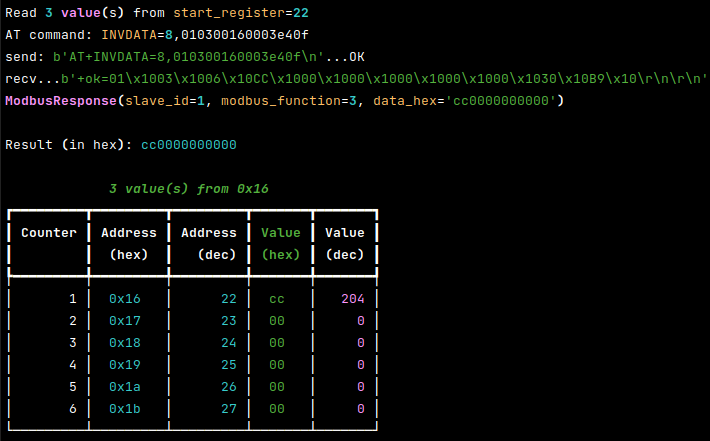
Example output of read-register call:
For development, we have a separate CLI, just call it:
~/inverter-connect$ ./dev-cli.py --helpThe output of ./dev-cli.py --help looks like:
Usage: ./dev-cli.py [OPTIONS] COMMAND [ARGS]...

╭─ Options ────────────────────────────────────────────────────────────────────────────────────────╮
│ --help      Show this message and exit.                                                          │
╰──────────────────────────────────────────────────────────────────────────────────────────────────╯
╭─ Commands ───────────────────────────────────────────────────────────────────────────────────────╮
│ check-code-style            Check code style by calling darker + flake8                          │
│ coverage                    Run and show coverage.                                               │
│ create-default-settings     Create a default user settings file. (Used by CI pipeline ;)         │
│ fix-code-style              Fix code style of all inverter source code files via darker          │
│ install                     Run pip-sync and install 'inverter' via pip as editable.             │
│ mypy                        Run Mypy (configured in pyproject.toml)                              │
│ publish                     Build and upload this project to PyPi                                │
│ safety                      Run safety check against current requirements files                  │
│ test                        Run unittests                                                        │
│ tox                         Run tox                                                              │
│ update                      Update "requirements*.txt" dependencies files                        │
│ update-test-snapshot-files  Update all test snapshot files (by remove and recreate all snapshot  │
│                             files)                                                               │
│ version                     Print version and exit                                               │
╰──────────────────────────────────────────────────────────────────────────────────────────────────╯
Others before me have done good work. In particular, I have learned a lot from the following projects:
- /~https://github.com/s10l/deye-logger-at-cmd
- /~https://github.com/kbialek/deye-inverter-mqtt
- /~https://github.com/StephanJoubert/home_assistant_solarman
The included definitions yaml files are from:


