LLD:E2ETesting
- Introduction
- Testing strategy
- How does it work?
- Installation and Configuration
- Local Execution
- CI Execution
- Reporting
- Xray
- How to write an E2E test?
- Common issues
- Resources
- Contribution
- Limitations
This project is maintained by the QAA squad. Please feel free to contact us if you have any questions. Thank you in advance for your contributions!
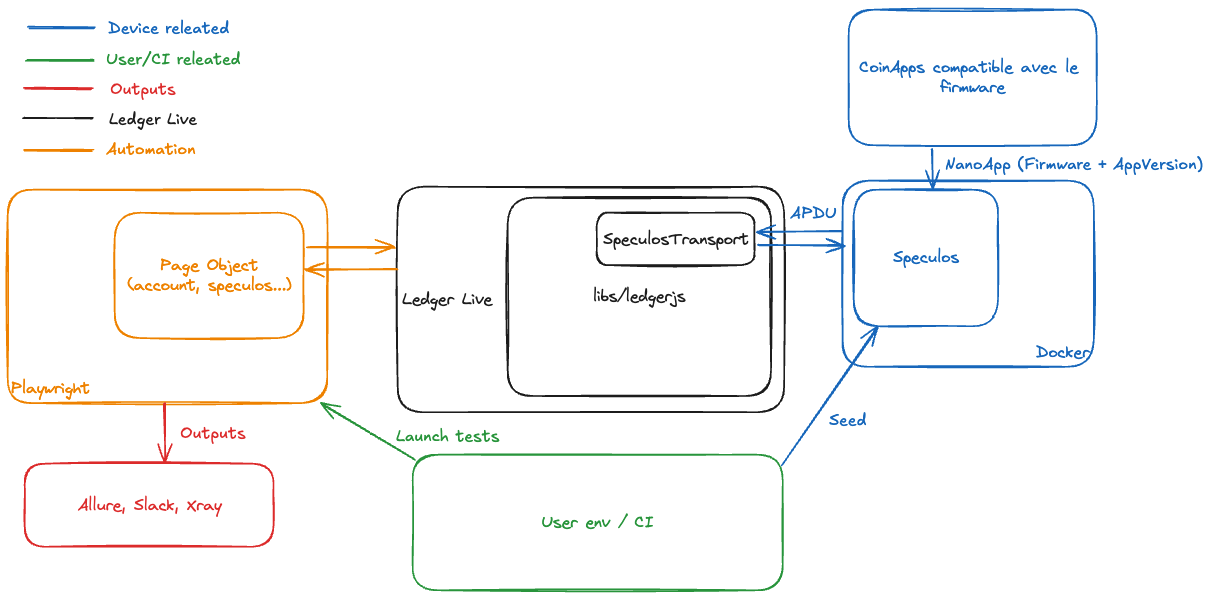
To enhance our testing framework and better align with user experience, we are leveraging Speculos.
Speculos is an emulator for Nano apps that allows interaction with the blockchain, including verifying addresses, sending, swapping, and more.
Currently, we maintain 150+ UI end-to-end test scenarios executed using Speculos in conjunction with Playwright.
Speculos is a launcher. In the context of e2e tests on Ledger Live, our goal is to instantiate it with the correct libraries that will be used later on during the test scenario. In the context of swaps, up to two libraries (the app to swap from and the app to swap to) will be needed to perform the operations. If a swap is to be performed from ETH to USDT, only one library will be needed (ETH one as USDT is an ERC20). To make it work seamlessly, we add the app candidates (based on the device and last apps versions) to a map to make sure every lib is present no more than once. The swap dependencies are loaded at the beginning of a scenario, within the exchange app.
Spawning Speculos: For each cryptocurrency (coin), a dedicated Speculos instance is spawned. This instance emulates the specific Nano app needed for the tests.
Running Tests: The test scenarios are then executed, interacting with the Speculos instance to simulate real blockchain operations.
Terminating Speculos: Once the tests are completed, the Speculos instance is terminated to free up resources.
Test data preparation: Before running tests, we use the CLI to create the required test data. This step ensures that the necessary data is set up correctly for the test scenarios. Users can also leverage the CLI for test data preparation to customize or set up different environments for their tests. For detailed instructions on how to use the CLI for test data creation, please refer to the CLI documentation.
Transaction Broadcasting on CI: We only broadcast transactions on Monday nightly as part of the CI process. This is because broadcasting transactions every day would incur high fees, which would be too expensive. By limiting it to once a week, we ensure that we don’t exhaust the funds on the Speculos seed and can maintain the necessary balance for the following test scenarios.
This strategy allows us to remove mocks and conduct tests that closely mimic real user interactions, providing more reliable test results.
We assume your setup is running the ledger-live monorepo or at least the ledger-live-desktop app. If not, please refer to the installation guide and the wiki.
- Docker Desktop
- Testing seed phrase
To run the tests, you need to set up several things:
-
Ledger Live repository (as mentioned above)
-
Clone the CoinApps repository: HTTPS:
git clone /~https://github.com/LedgerHQ/coin-apps.gitSSH:git clone git@github.com\:LedgerHQ/coin-apps.git -
Clone Speculos repository: HTTPS:
git clone git@github.com\:LedgerHQ/speculos.gitSSH:git clone git@github.com\:LedgerHQ/speculos.git
Once the Speculos repository is cloned, follow these steps:
-
Open Dockerfile: Replace line #7:
- FROM ghcr.io/ledgerhq/speculos-builder\:latest AS builder + FROM speculos-builder\:latest AS builder -
Then, in your terminal:
docker build -t speculos-builder\:latest -f build.Dockerfile .
docker build -f Dockerfile -t speculos\:latest .
Next, export the environment variables:
export MOCK=0
export COINAPPS="/Users/firstname.lastname/coin-apps"
export SEED="secret"
export SPECULOS_IMAGE_TAG=speculos
📝 Notes:
- The command export COINAPPS="/Users/firstname.lastname/coin-apps" should be adjusted according to the location where the repository is cloned.
- Since we using using specific salt, you will have to reach out with QAA team to get the Speculos seed.
Before executing any test, don’t forget to build the app and the dependencies, do it whenever the source code changes.
pnpm build:lld
pnpm build:cli
pnpm desktop build:testing
Install the playwright dependencies
pnpm desktop test:playwright:setup
Run a single test
pnpm desktop test:playwright:speculos <testFileName>
Run all the tests
pnpm desktop test:playwright:speculos
To optimize the test execution time, we employ a sharding strategy. This is done by using the built-in Playwright feature which involves splitting the test suite into smaller shards, which are run in parallel across multiple instances. This approach reduces the overall execution time and ensures faster feedback. Today we are using three shards.
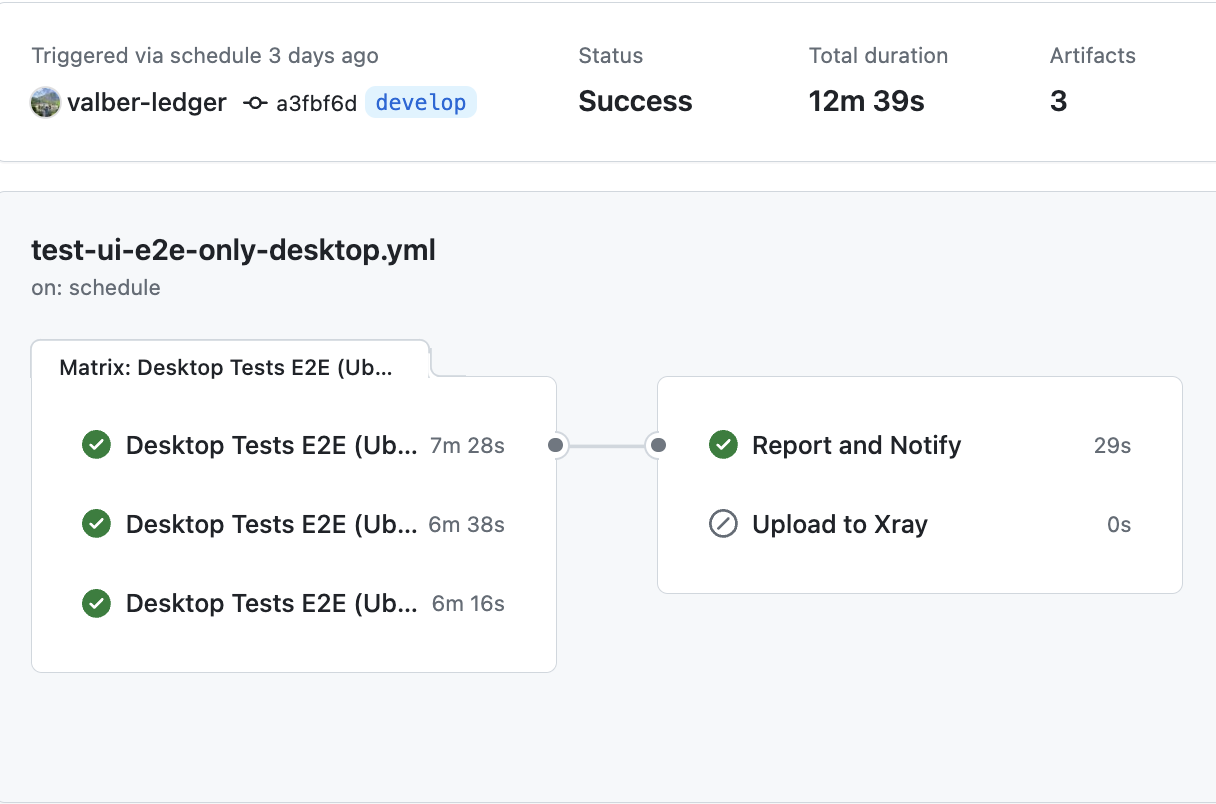
A nightly run of the full test suite is scheduled to ensure ongoing bug detection. The result of this run is visible in the #live-repo-health slack channel.
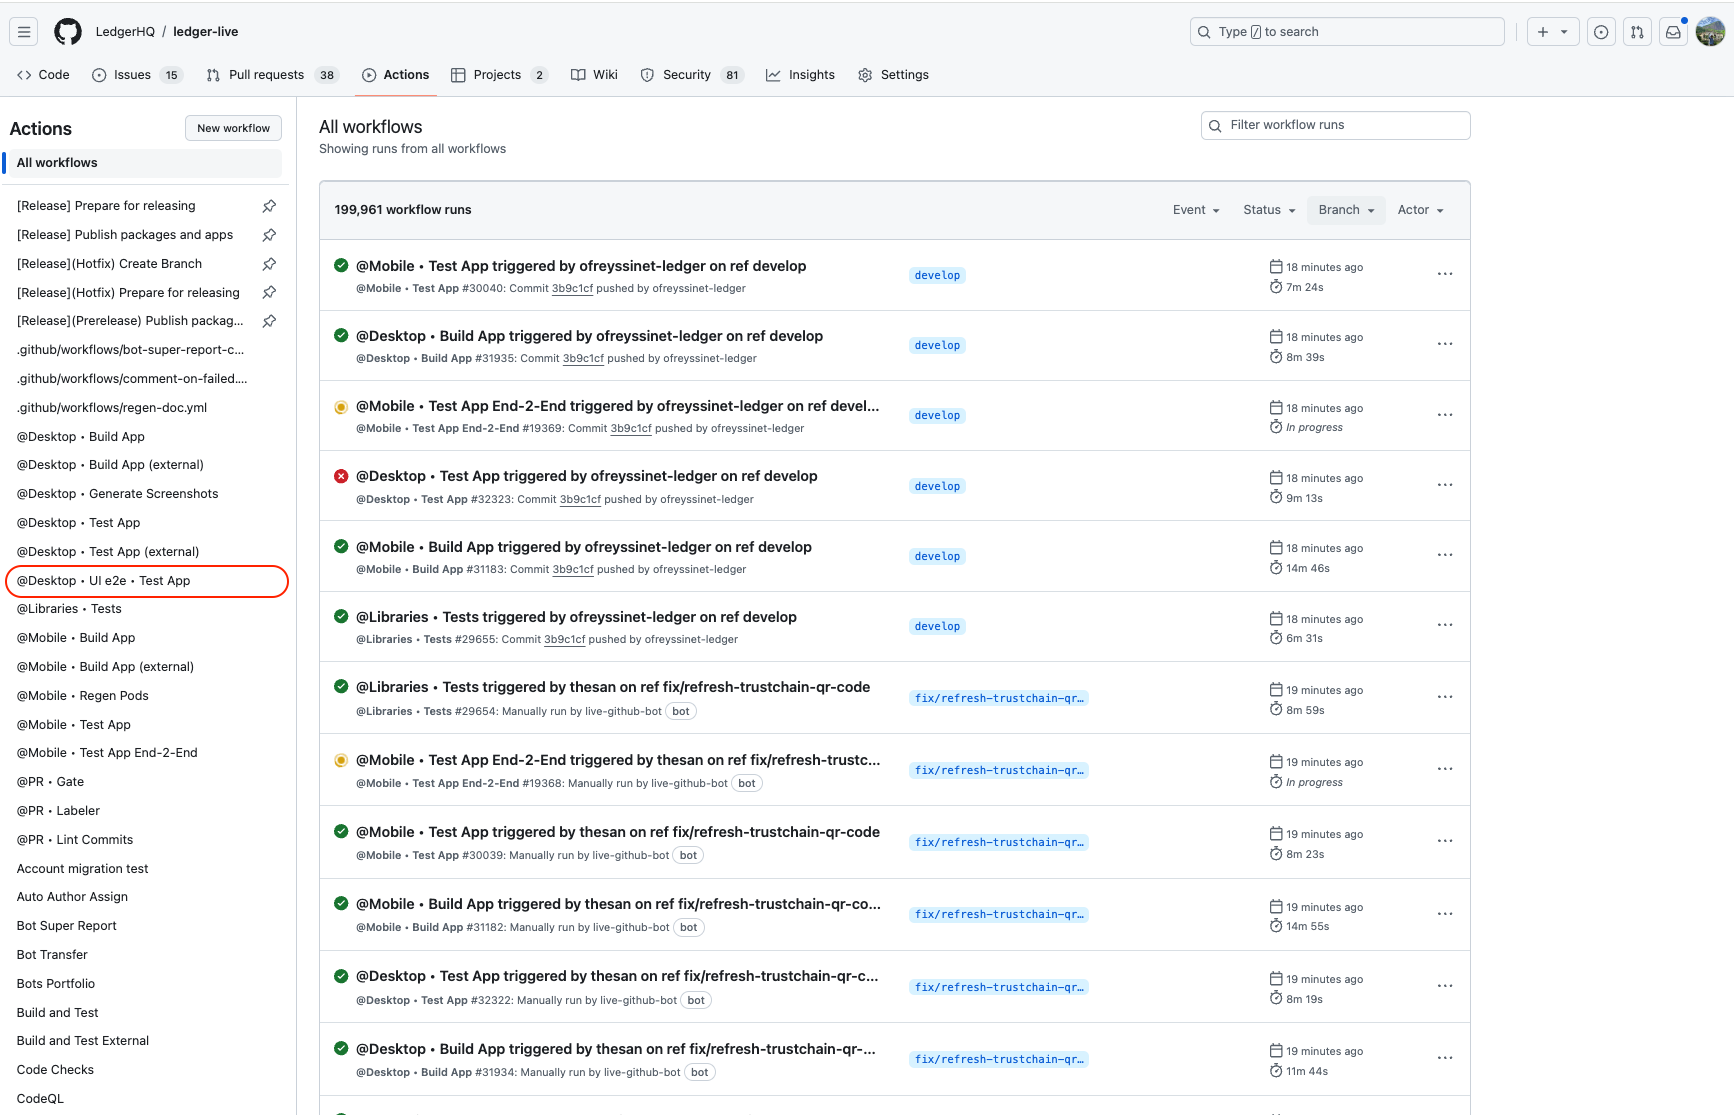
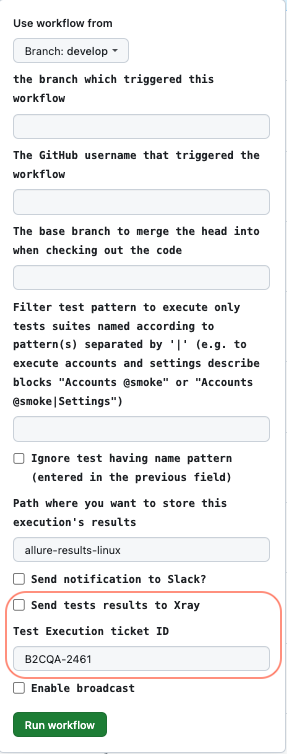
You can also execute Speculos tests on the CI using the @Desktop - UI e2e - Test App workflow. Additionally, it’s possible to filter the tests to run by specifying the name of the test suite (e.g., swap). Moreover, you can select the backend on which to execute the tests (JS for production).
The workflow uses specific inputs that can be configured before execution:
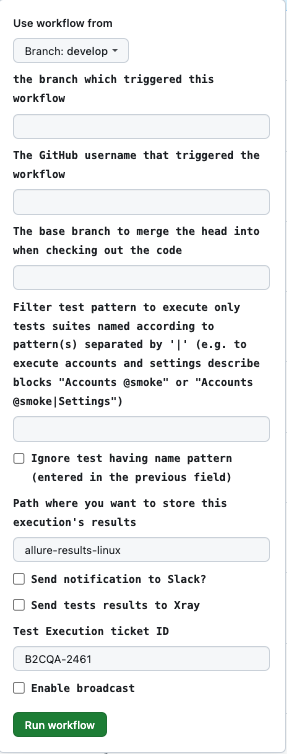
Input 1: Send notification on Slack channel:
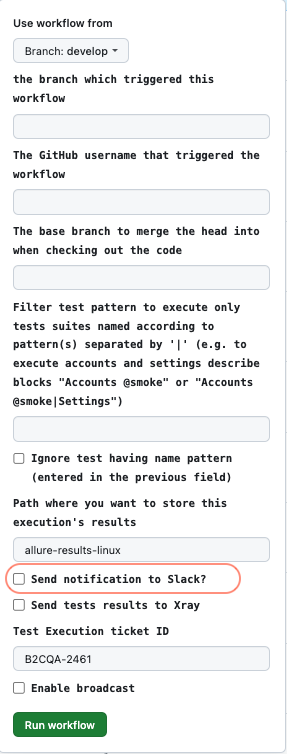
Input 2: Send results to Xray:
Input 3: Enable Broadcast input:

In case of test failures, the following steps should be taken to investigate:
Check Screenshots on allure report: Screenshots are automatically captured at the point of failure and can provide immediate insight into the issue.
Review Logs: Logs generated during test execution can help identify the root cause of the failure.
Rerun the Test: If needed, rerun the specific failed test in isolation to reproduce and analyze the issue.
All test results are collected and reported through Allure. The Allure dashboard provides detailed reports on each test case, including steps executed, screenshots, and logs. This enables easy tracking of test performance and quick identification of issues.
It is also possible to generate and access the Allure report locally (requires allure-commandline), follow these steps:
-
Run the test suite.
-
Navigate to Ledger-live-desktop: Open your terminal and navigate to the directory:
cd apps/ledger-live-desktop -
Generate the Report: Use the Allure command-line tool to generate the report from the test results:
allure serve
Test results are also integrated with Slack for real-time notifications. The results are posted in the #live-repo-health channel, including:
A direct link to the Allure report for detailed insights.
A link to the CI run where the tests were executed.
This ensures that the members of the channel are immediately informed of any issues that arise during test execution.
To send test results to Xray, ensure that the "Send tests results to Xray" option is checked in the workflow input fields. Additionally, you must provide a valid Jira Test Execution ticket ID in the "Test Execution ticket ID" field.
🚨 Warning: Check if the element is already identified and if a page object and/or test already exists. If not, create new ones.

To interact with web elements (buttons, input fields, images, …), they should be identified using a data-testId for unique elements or a class for multiple elements.
💡 Tips: Convention: Use the pattern
<context>-<text or purpose>-<element type>
Example:
I want to identify the Get started CTA button in onboarding flow.
Look for your element in src/renderer/... and give it a data-testId attribute.
<button data-testId="”onboarding-getstarted-button”">Get started</button>💡 Tips: Page objects are JavaScript classes that encapsulate the elements and actions of a specific screen in your application.
Path: ledger-live/apps/ledger-live-desktop/tests/page
Exemple: In this step, we’ll declare and use the "Get Started" button element in a page object for the Onboarding screen.
-
Go to
ledger-live/apps/ledger-live-desktop/tests/page/onboarding.page.ts -
Declare your element:
private getStartedButton = this.page.getByTestId("onboarding-getstarted-button");
-
Add an action:
Create an action by interacting with declared elements, you can make multiple actions in one method and wait for a specific state if needed.
@step("Click on get Started Button")
async clickGetStarted() {
  await expect(this.getStartedButton).toBeVisible();
  await this.getStartedButton.click();
}
📝 Note: It’s important to annotate your action methods with the @step decorator to ensure proper reporting and traceability
At the end, your page Object should like like this:
import { AppPage } from "tests/page/abstractClasses";
import { expect } from "@playwright/test";
import { step } from "tests/misc/reporters/step";

export class OnboardingPage extends AppPage {
  private getStartedButton = this.page.getByTestId("onboarding-getstarted-button");

  @step("Click on get Started Button")
  async clickGetStarted() {
    await expect(this.getStartedButton).toBeVisible();
    await this.getStartedButton.click();
  }
}🚨 Warning: If a test file already exists, do not create a new one. Instead, add your test to the appropriate existing file (e.g., "I want to add a step in the Add Account test").
Path: ledger-live/apps/ledger-live-desktop/tests/specs/speculos/
A test file groups a series of actions and assertions to define a test scenario.
Exemple: Let's say you want to create a test file for the onboarding flow.
- Create the file
../tests/specs/speculos/onBording.spec.ts - Inside the file, write the test structure as follows:
test.describe("Onbording test - Exemple", () => {
  test.use({
    userdata: "skip-onboarding",
  });
  test(
    "Onbording test - Exemple",
    {
      annotation: {
        type: "TMS",
        description: "B2CQA-xxx",
      },
    },
    async ({ app }) => {
      await addTmsLink(
        getDescription(test.info().annotations, "TMS").split(", ")
      );
      await app.onbording.clickGetStarted();
    }
  );
});
- Don't forget to link the test case to the corresponding XTAY ticket (replace B2CQA-xxx By the correct number). Every test case should be linked to the test case ticket in XRAY!
🚨 Important 🚨: In order to use onboarding.clickGetStarted() in your test, make sure it is imported and instantiated in the app object (located at ledger-live/apps/ledger-live-desktop/tests/page/index.ts).
Here’s an example of how to import and set up the page object:
import { PageHolder } from "tests/page/abstractClasses";
import { OnboardingPage } from "../page/onboarding.page";

export class Application extends PageHolder {
    public onboarding = new OnboardingPage(this.page);
}
💡 Tips: Always include the test number (e.g., B2CQA-xxx) corresponding to the test you're automating. Use the addTmsLink() function to link it to Allure (see example above).
When using Speculos 🍫, here's how the test.use setup should look:
test.use({
    userdata: "skip-onboarding",
    speculosApp: currency.currency.speculosApp, //name of the speculos app (eg: "Bitcoin")
});Run it at least 3 times to be sure it's not flaky.
pnpm desktop test:playwright:speculos <newTest>
💡 Tips: If you get into troubles, please read this and this.
After a workflow run: To access the Allure report after a workflow run, you need to be connected to the green VPN. If you encounter issues accessing the report, try the following steps:
- Ensure VPN Connection: Make sure you are connected to the green VPN. If you need assistance with VPN setup, refer to the VPN setup guide on Confluence.
- Try Incognito Mode: If the report is not accessible in normal browser mode, try opening it in incognito mode. This can help bypass any cached issues that might be preventing access.
Verifying Exports
The majority of local issues stem from incorrect or missing environment variables. Ensure that your env includes the following variables and that they are correctly configured:
- MOCK
- COINAPPS
- SEED
- SPECULOS_IMAGE_TAG
Debugging Local Test Failures To debug tests that fail locally, you can enable debugging tools by setting the following environment variables before running your tests:
- PWDEBUG=1: Enables the Playwright debugger.
- DEV_TOOLS=1: Opens the Ledger Live developer tools.
Example command:
PWDEBUG=1 DEV_TOOLS=1 pnpm desktop test:playwright:speculos swap
Activating/Deactivating Broadcast Locally
To activate or deactivate the broadcast feature locally, set the DISABLE_TRANSACTION_BROADCAST environment variable before running your tests:
DISABLE_TRANSACTION_BROADCAST=1 pnpm desktop test:playwright:speculos swap
Re-exporting COINAPPS Some issues may be due to updates in the Nano app. To re-export COINAPPS, navigate to the coin-apps repository and pull the latest changes from the develop branch:
cd path/to/coin-apps
git pull origin develop
Changing SEED
To change the SEED, export the new SEED value in your environment:
export SEED="new seed value"
Cleaning Up Docker Images If tests fail or are interrupted (e.g., using cmd + C), Docker images may not be properly cleaned up. Manually remove any lingering Docker images to ensure that Speculos can launch on the correct port.
Loading app.json with Preconfigured Feature Flags To run a test with specific feature flags without modifying Firebase, manually add the feature flags to the app.json file used by the test (located in the userdata folder).
Deeplink issues On macOS, enabling dev mode can override the default deeplink for Ledger Live production. To reset the deeplink, use the SwiftDefaultApps tool. This tool allows you to change the target for the Ledger Live deeplink.
For any issues related to the CLI, please refer to this documentation. It provides detailed guidance and troubleshooting steps to help you resolve common problems.
We welcome contributions to this project. Whether it's adding new test scenarios, or improving existing ones, your contributions are highly appreciated. Please follow the standard contribution guidelines and ensure all changes are tested thoroughly before submitting a pull request.
While this testing strategy offers significant benefits, there are some limitations to be aware of:
The primary limitation is that Speculos can only emulate the applications (apps) running on Nano devices, not the underlying operating system (OS) of the devices themselves. As a result, certain functionalities of Ledger Live cannot be fully covered by Speculos-based tests. For example:
- App Installation: It is not possible to simulate the downloading and installation of apps onto the Nano device.
- My Ledger Section: Operations that involve interacting with the "My Ledger" section, such as managing apps on the device, cannot be tested using Speculos.
We continue to explore ways to mitigate these limitations and enhance the overall coverage and reliability of our test suite.