- 🔍 Introduction
- 🛠️ What is a Bad USB?
- 🖱️ Understanding Rubber Ducky and Ducky Script
⚠️ Risks and Dangers of Bad USB Devices- ⚖️ Legal Considerations
- 🛡️ Protecting Against Bad USB Attacks
- 📜 Step-by-Step Guide: Converting Raspberry Pi Pico into a Bad USB
- Quick Setup
- Detailed Setup
- ⚙️ Exploring Additional Functionalities with GPIO Pins
- Setup Mode
- USB Enable/Disable Mode
- 📚 Conclusion
- 🔗 References
Welcome to this comprehensive guide where we explore how to transform a Raspberry Pi Pico 🛡️ into a Bad USB device 🖱️. Bad USB devices mimic trusted peripherals like keyboards to execute automated commands, often for penetration testing or educational purposes.
This tutorial will explain:
- What Bad USB devices are 🖥️.
- How they function.
- Potential dangers
⚠️ and how to protect yourself 🛡️. - Legal considerations ⚖️.
- Step-by-step instructions to convert a Raspberry Pi Pico into a Bad USB device 🛠️.
- Bonus: Advanced uses with GPIO pins! ⚙️
A Bad USB device is a USB peripheral that emulates trusted devices, such as keyboards or network adapters, to execute pre-programmed tasks. These devices are often used in cybersecurity to test system vulnerabilities.
- Looks harmless: Often disguised as a USB flash drive 🔌.
- Acts maliciously: Executes unauthorized commands
⚠️ . - Hard to detect: Recognized as a "trusted" device by the operating system 🖥️.
The USB Rubber Ducky, developed by Hak5, is a keystroke injection tool. It resembles a USB stick but operates as a programmable keyboard that can type at superhuman speeds 💨.
Ducky Script is the scripting language used to program Rubber Ducky devices. It allows users to define sequences of keystrokes, delays, and special commands 🖋️.
REM Open Notepad
DELAY 1000
GUI r
DELAY 500
STRING notepad
ENTER
This script opens Notepad on a Windows machine and is executed in seconds ⏱️.
Bad USB devices pose significant risks:
- Data theft: They can steal sensitive information like credentials 🔑.
- Malware installation: They can install backdoors or viruses 🐛.
- System compromise: Execute commands to disrupt operations 🛑.
⚠️ Note: These devices are difficult to detect and mitigate without proper security measures.
Using Bad USB devices without consent is illegal 🚨. They should only be used for authorized penetration testing or educational purposes. Unauthorized use may result in:
- Legal consequences ⚖️.
- Reputation damage 🚫.
✅ Always ensure you have explicit permission before conducting security tests!
- 🚫 Avoid connecting unknown USB devices.
- 🛡️ Use USB protection tools like endpoint security solutions.
- 🔒 Educate users about the dangers of Bad USB devices.
- 📜 Implement device whitelisting to limit USB device connections.
- Raspberry Pi Pico board 🔌.
- Micro USB cable 📎.
- Computer with internet access 🌐.
- Go to the CircuitPython download page 🌐.
- Download the latest
.UF2file for the Pico 💾.
- Hold the BOOTSEL button while connecting the Pico to your computer ⚙️.
- Drag and drop the
.UF2file onto the RPI-RP2 drive 🖥️. - The Pico will reboot and appear as
CIRCUITPY💡.
- Download the Adafruit HID library 📦.
- Copy the
adafruit_hidfolder to thelibdirectory on theCIRCUITPYdrive 📂.
- Create a Python script using the Adafruit HID library to execute a Ducky Script payload, or download the preconfigured script from here 🎯.
- Save the script as
code.pyon theCIRCUITPYdrive 🖋️.
Example:
import time
import board
import usb_hid
from adafruit_hid.keyboard import Keyboard
from adafruit_hid.keycode import Keycode

keyboard = Keyboard(usb_hid.devices)

time.sleep(1)
keyboard.press(Keycode.GUI, Keycode.R)  # Open Run
keyboard.release_all()
time.sleep(0.5)
keyboard.write("notepad\n")
Note: This script simulates the execution of a Ducky Script payload. Make sure to replace this with the payload you want to run.
- You can find an existing Ducky Script payload here 🌐, or create your own using Ducky Script.
- Save the Ducky Script as
payload.ddin the root folder of your Pico 💾.
Note: Currently, the pico-ducky only supports DuckyScript 1.0, and some features of 3.0
⚠️ .
- Ensure the device is in setup mode before you disconnect it from your computer ⚙️.
- If the device isn't in setup mode, it will reboot automatically 🔄 and execute the script within half a second 💨.
- Make sure to double-check before disconnecting the device to prevent unwanted execution of the payload 🚨. .
- After setting up the payload, safely test the device in an isolated environment 🛡️ (e.g., using a virtual machine or a non-essential system) to avoid potential harm to your computer 💻.
- Reconnect the Pico to the computer ⚡. The device will automatically execute the payload, so ensure you're in a safe environment before proceeding 🔐.
- Clone the repository to get preconfigured files:
git clone /~https://github.com/dbisu/pico-ducky.git
- This will provide you with the necessary scripts and files to get started.
- Get the appropriate
.UF2file for your Raspberry Pi Pico model: - Make sure to download the latest version to ensure compatibility.
- To install CircuitPython on your Pico, follow these steps:
- Hold down the BOOTSEL button on the Pico while connecting it to your computer ⚙️.
- After the Pico is connected, it will appear as a storage device called
RPI-RP2🖥️. - Copy the downloaded
.UF2file to theRPI-RP2drive. - Once the file is copied, the device will reboot and will appear as
CIRCUITPY💡.
- Download the Adafruit CircuitPython Bundle and extract the files.
- From the extracted folder, copy the following libraries to the
libfolder on your Pico:adafruit_hidadafruit_debouncer.mpyadafruit_ticks.mpyasyncioadafruit_wsgi
- After cloning the repo, copy the following files from the cloned repository to the root folder of your Pico:
boot.pyduckyinput.pycode.pywebapp.pywsgiserver.py
- These scripts are essential for making the Pico work as a Bad USB device.
- If you're using a Pico W model and want to configure Wi-Fi, create a file named
secrets.pyin the root of your Pico and add the following content:secrets = { 'ssid': "YourAPName", 'password': "YourAPPassword" }
- Replace
"YourAPName"and"YourAPPassword"with the actual credentials of your Wi-Fi network.
- Save your Ducky Script payload as
payload.ddon the Pico.
Note: Currently, the setup supports DuckyScript 1.0 and partial DuckyScript 3.0.
- After everything is set up, disconnect and reconnect the Pico to execute the payload automatically.
- The device will run the payload script when reconnected, simulating the keystrokes or actions defined in the DuckyScript.
The GPIO pins on the Raspberry Pi Pico offer flexibility for advanced features:
- Custom Triggers: Use buttons or switches to control payload execution 🔘.
- Status LEDs: Indicate device state (e.g., ready, running, or error) 💡.
- Multi-Payload Support: Implement multiple payloads based on GPIO pin states 🔀.
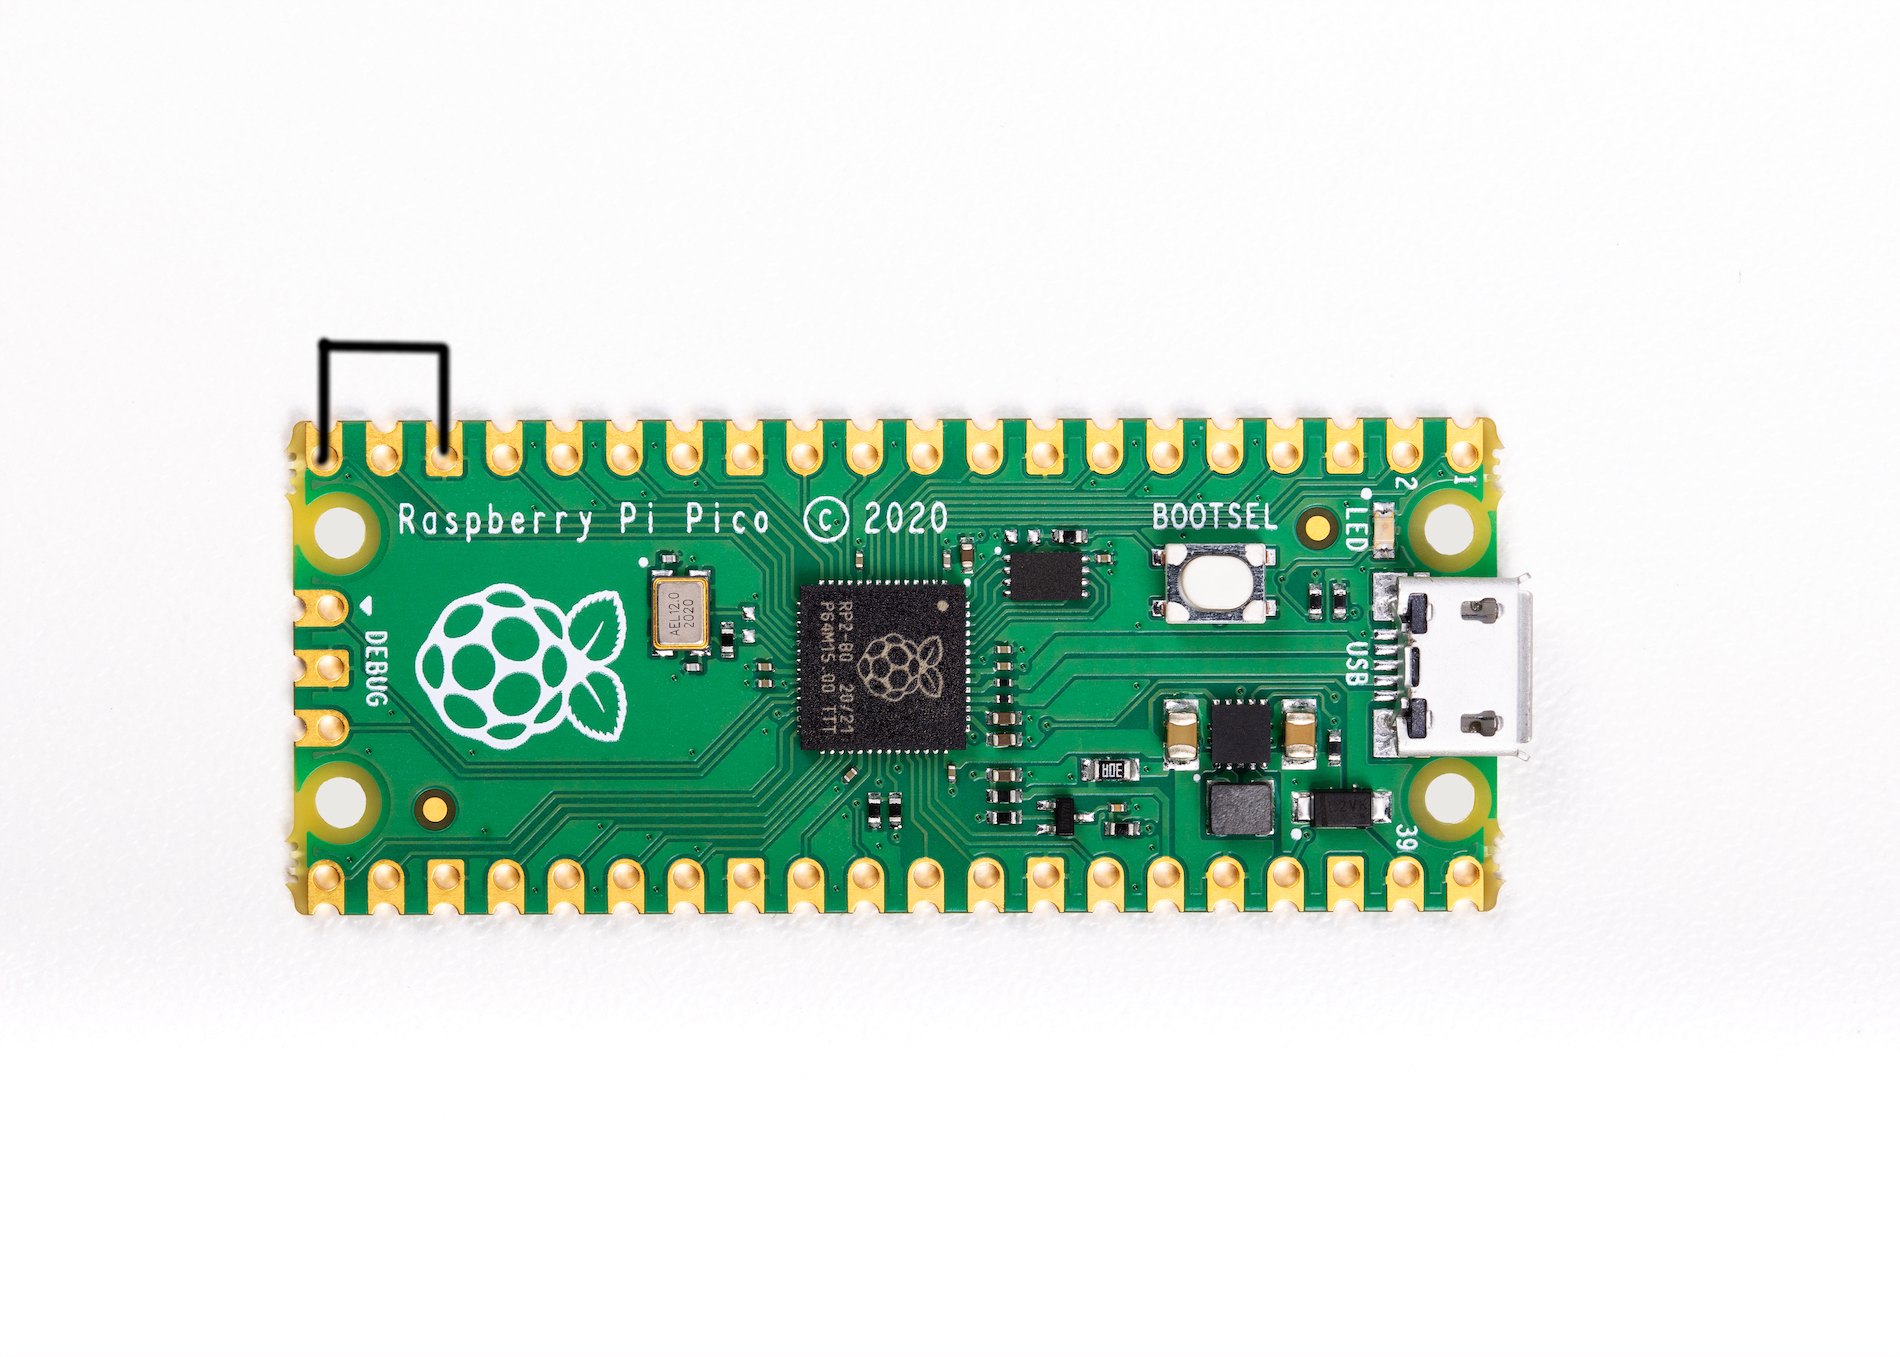
To edit the payload, enter setup mode by connecting pin 1 (GP0) to pin 3 (GND). This will stop the Pico-Ducky from injecting the payload on your own machine.
Steps:
- Use a jumper wire to connect GP0 and GND.
- This will enable setup mode and prevent unintended payload execution.

If you want the Pico-Ducky to operate stealthily without appearing as a USB mass storage device, follow these instructions:
-
Enter Setup Mode:
- Connect GP0 to GND using a jumper wire.
-
Upload Payload:
- Copy your payload script to the Pico-Ducky.
-
Disconnect:
- Safely disconnect the Pico from your host PC.
-
Stealth Mode:
- Connect a jumper wire between pin 18 (GND) and pin 20 (GPIO15).
- This prevents the Pico-Ducky from showing up as a USB drive when plugged into the target computer.
-
Reprogram Mode:
- Remove the jumper wire and reconnect the Pico to your PC to reprogram.
- Pico: USB mass storage is enabled by default.
- Pico W: USB mass storage is disabled by default.
These configurations enhance security and flexibility for advanced use cases. 🔒
Converting a Raspberry Pi Pico into a Bad USB demonstrates the importance of cybersecurity awareness 🛡️. While these devices have legitimate uses, they must be handled responsibly and ethically ⚖️. Stay informed, stay safe!
- CircuitPython Download Page for Raspberry Pi Pico 🌐
- Adafruit HID Library 📦
- Pico-Ducky Repository 🔗
- DuckyScript 1.0 and 3.0 Documentation 📝
A large part of the information and setup process in this guide was sourced from the pico-ducky repository. Many thanks to the contributors for their excellent work in creating and documenting the project. Here's a breakdown of what was sourced:
- Code for transforming Raspberry Pi Pico into a Bad USB device 💻
- Detailed setup instructions 📖
- DuckyScript implementation and examples 🖥️
Check out their repository for more details and additional resources! 🚀
Using a Raspberry Pi Pico as a Bad USB device can cause serious security risks if misused.
Always be cautious and respect legal boundaries when working with these tools.
The creator of this repository is not responsible for any misuse of the information shared.
Use at your own risk!
Thank you for exploring this project! Always prioritize security and ethical practices when learning about hacking and cybersecurity.
Stay safe, stay informed, and keep learning! 🚀