-
Notifications
You must be signed in to change notification settings - Fork 514
Home
Version 1.1.0
This guide explains the Auto Photoshop UI and its main features, it doesn't go into any detail of how Stable Diffusion works or the functionalities implemented by AUTOMATIC1111. For the latter you can read the manual here.
!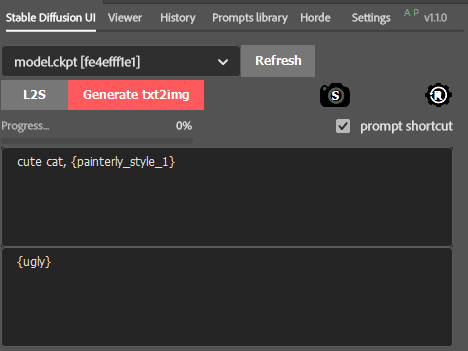
- Model Selection - allows to select the .ckpt / .safetensors model to be used for image generation.
- Refresh - refreshes the models. Note: this will extract all loaded models in AUTOMATIC1111, if you want to add a new model, first refresh AUTOMATIC1111.
- L2S (Layer to selection) - convenience function to move the content of the currently selected layer into the photoshop selection.
- Snapshot - convenience function equivalent to "ALT + Merge Visible Layers"
- Reset - reset UI to default values
- Prompt Shortcut - enables prompt shortcuts
- Prompt - text area for the image generation prompt
- Negative Prompt - text area for the image generation negative prompt

- Images: number of images to be generated in a single generation session
- Steps: number of steps
- Selection Mode Ratio: the generation dimension will be set automatically to match the proportion of the photoshop selection, using 512 as the base value.
- Selection Mode Precise: the generation dimension will be set to match exactly the photoshop selection.
- Selection Mode Ignore: the generation dimension are set by the user.
- Width and Heigth: the image generation dimensions
- CFG Scale: Influence strength of the prompt (for details please see the AUTOMATIC1111 wiki)
- Restore Faces: enables the restore faces function in AUTOMATIC1111
- Hi Res Fix: enables the Hi Res Fix function in AUTOMATIC1111 (see below)
- Seed: Displays and edit current seed (-1 = Random)
- Random / Last: sets seed to either random or last generation
- Show Samplers: allows to select the sampler used for image generation
Hi Res Fix
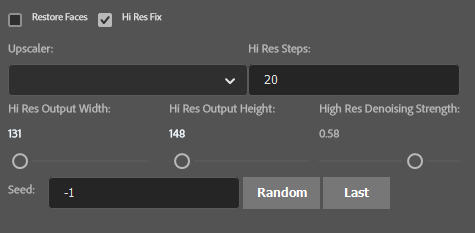
When Hi Res is checked, a number of parameters become avaiable including Upscaler model to be used, output dimensions and denoising strength. This is just an interface into the AUTOMATIC1111 functionality described here.
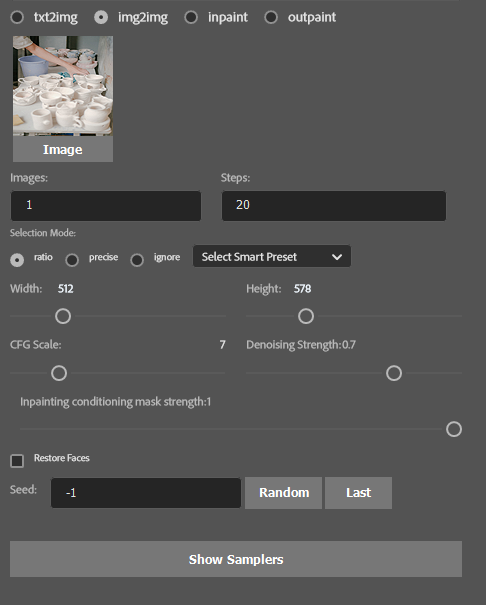
- Image: shows the current image used as img2img base.
- Denoising Strength: how much Stable Diffusion should be influenced by the image, 0 = output is same as image, 1 = completely different image.
- Inpainting conditioning mask strength; this field only works with inpainting special models (ending in "-inpainting."). Determines how much the process should stick to the image structure, check out this post for details.
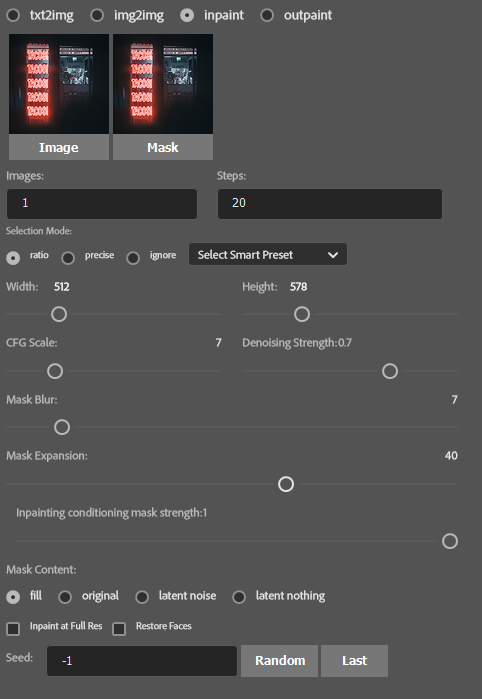
- Image / Mask: show image and mask used for the inpaint process
- Denoising Strength: similar to img2img however it behaves differently depending on Mask Content context.
- Mask Blur: how much to blur the mask before processing it in pixels
- Mask Expansion: how much the mask should expand to create a more blended output image
- Mask Content Fill: fill it with colors of the image
- Mask Content original: keep whatever was there originally
- Mask Content latent noise: fill it with latent space noise
- Mask Content latent nothing: fill it with latent space zeros
- Inpaining at Full Res: have a look here for an explanation of this feature.
- Restore Faces: same as img2img
UI and its functionality are same as inpaint.
Tab to manage the images generated in the current session.

- Set Mask: manually sets the currently selected mask
- Set Init Image: manually sets the currently selected image
- Generate More: adds more generated images to the current session
- Selection Area: selects the boundaries of the currently selected image in the viewer
-
 Keep all images generated in the current session
 -
 Discard all images generated in the current session
 -
 Keep only the selected image in the viewer
 -
 Discard the selected image in the viewer
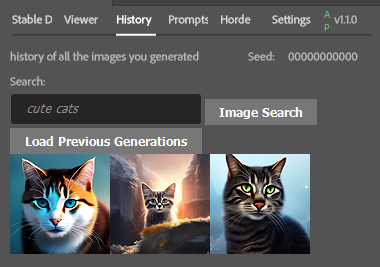
- Load Previous Generations: loads the images generated within this Photoshop file.
-
 hovering on the image loaded from history will allow bringing the image back into the Photoshop Layer stack
 - Clicking on the image will load the pluging settings for the image generation (seed and image generation configuration)
- Image Search: loads a set of images from the internet, clicking on any of the images will load them into the layer stack.

- For this to work a file will need to be created in the following location: Auto-Photoshop-StableDiffusion-Plugin\server\python_server\prompt_shortcut.json
- Load / Save: Once the file is present, values can be loaded and saved onto the file.
- Key / Value / Add top Prompt Shortcut: allows to change / add values to the existing json file.
- Refresh Menu: will load all values from the json, allowing the user to make changes to the value.
Coming Soon


- Make a selection where you want the image to be generated
- Press

- (optional) use the Viewer to select which images to keep in case of multiple image generation

- Generate images as usual
- Select the image in the viewer grid (shift + click for multiple selection)
- Choose from: keep one, discard one, keep all, discard all.
- Images are saved in the latest session layer folder.
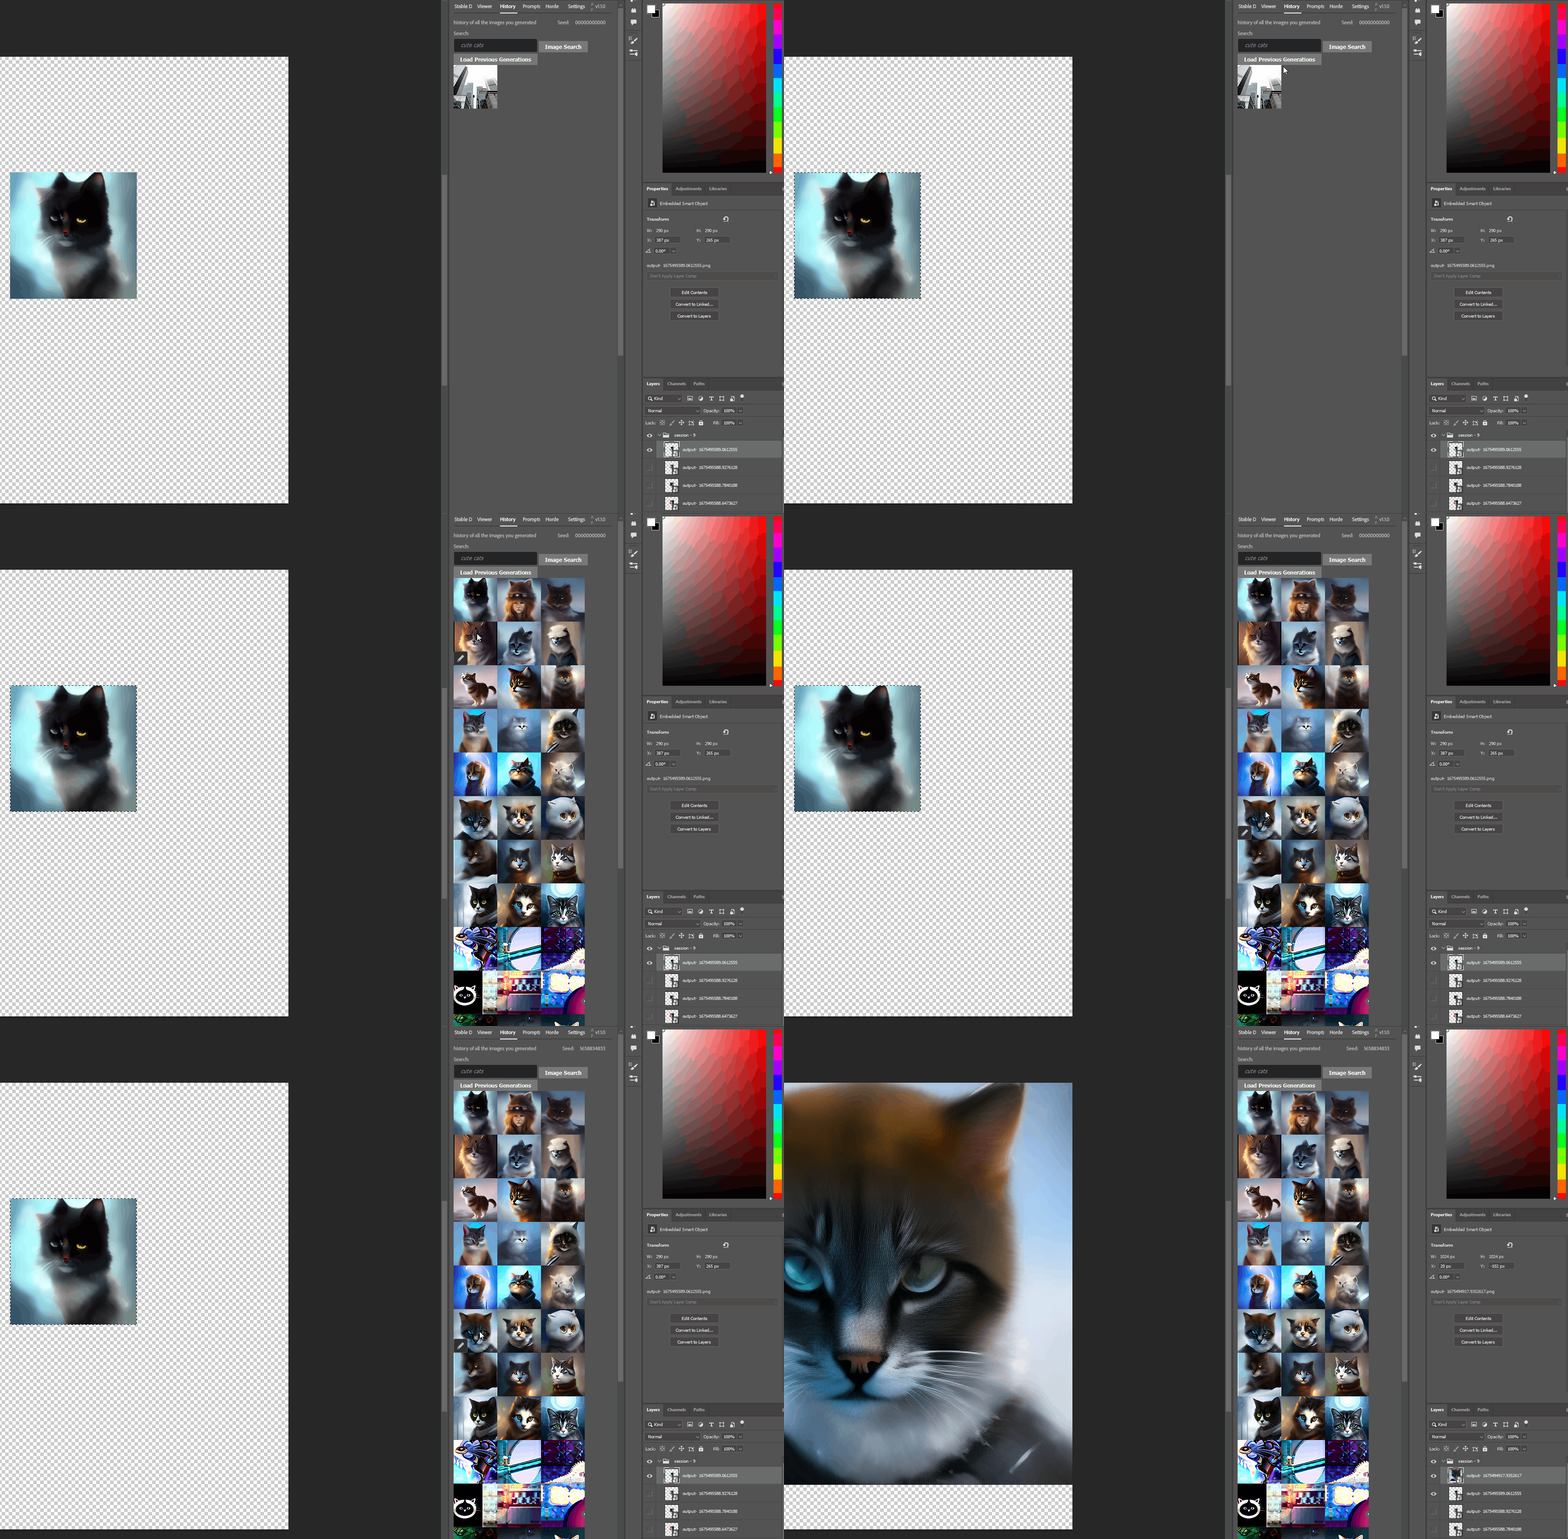
- Load Previous Generations button
- Single click on image to load its settings in the Stable Diffusion tab (seed, prompt, etc)
- Click on edit button to load the image in Photoshop

- Select the portion of the image to be used as a sample
- Select img2img mode and adjust the parameters (denoising strenght especially)
- Press Generate img2img
- (optional) use the Viewer to select which images to keep in case of multiple image generation
you can substitute a whole sequence of words with one word.
Instead of writing the following as a prompt :
Unreal Engine, Octane Render, arcane card game ui, hearthstone art style, epic fantasy style art
you could write:
{game_like}
as long as you have defined the relationship in the prompt library tab
{
"game_like": "Unreal Engine, Octane Render, arcane card game ui, hearthstone art style, epic fantasy style art"
}

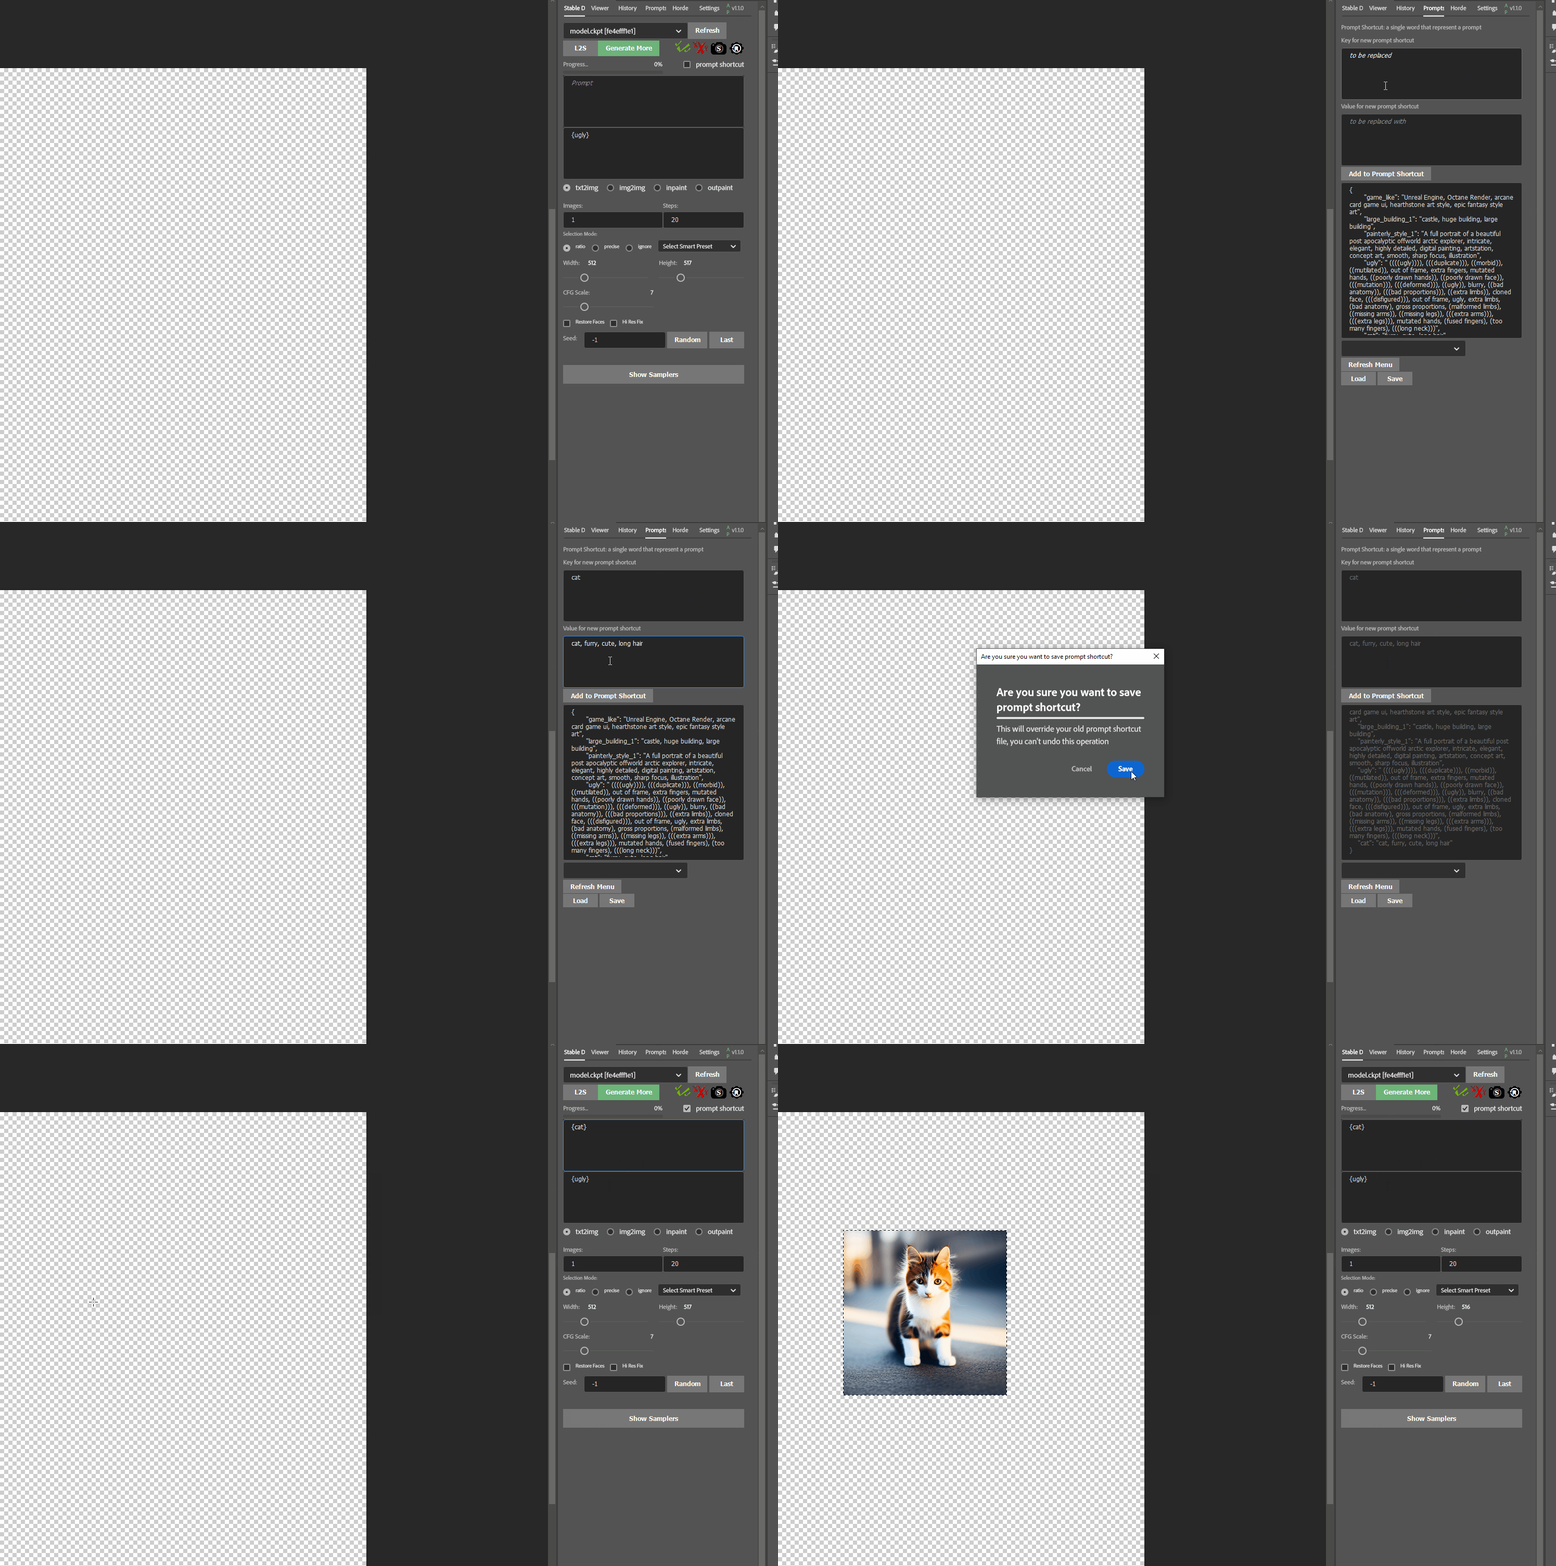
- Switch to the Prompt Shortcut tab.
- Load the json file.
- Input a keyword and its value
- Press Add to Prompt Shortcut
- Now the new Prompt Shortcut can be used in the Stable Diffusion tab
- To reuse previously saved shortcuts, ensure you load the json file at the start of each session.
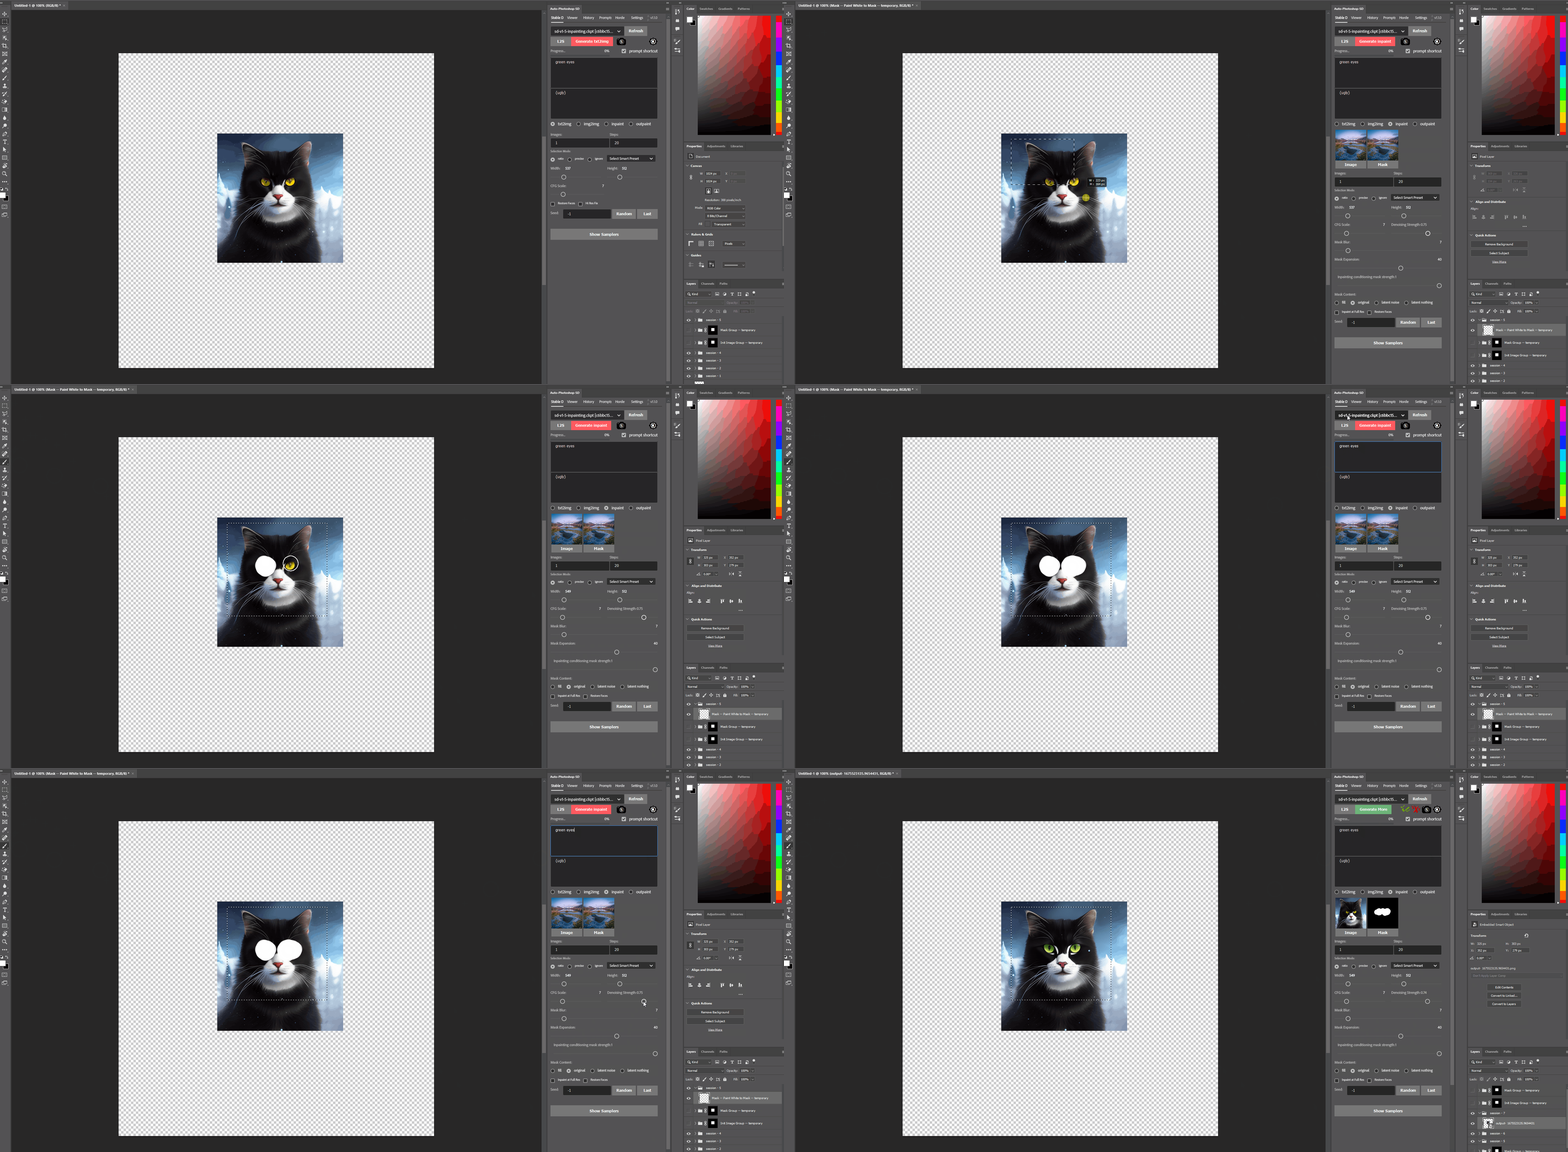
- Select inpainting mode in the Stable Diffusion tab
- Select the target area where to produce the image using rectangular marquee tool
- With a 100% opacity white brush paint the area that you wish to inpaint
- Ensure that you have a -inpainting.ckpt model selected (this is as important as it is easy to forget)
- Write a prompt describing the inpaining image
- Select the desired Mask Content option and adjust the Denoising Strength accordingly.
- Hit Generate

- Select outpainting mode in the Stable Diffusion tab
- Select the target area where to produce the image using rectangular marquee tool, ensure that you have some overlap with the existing image (to provide Stable Diffusion with some context) and that the target area is transparent.
- Ensure that you have a -inpainting.ckpt model selected (this also works for outpainting)
- Write a prompt describing the outpaining image
- Select the desired Mask Content option and adjust the Denoising Strength accordingly.
- Hit Generate

- Select the "Heal Brush" from the Smart Preset dropdown menu in the Stable Diffusion tab
- Select the target area where to produce the image using rectangular marquee tool
- With a 100% opacity white brush paint the area that you wish to erase
- Ensure that you have a -inpainting.ckpt model selected (this is as important as it is easy to forget)
- Write a prompt describing what you would like to see in the erased area
- Hit Generate